

CoinGate works differently from NOWPayments and Heleket. Buyers pick their
coin on CoinGate’s page rather than in Komerza, so CoinGate takes every coin
it supports at once and isn’t part of Coin Routing.
Prerequisites
- A verified CoinGate business account. On coingate.com, create a business account from your personal dashboard and complete business verification - CoinGate won’t let you receive payments until it’s approved. Your store has to be live and publicly reachable before CoinGate approves it.
- A live account. Tokens from CoinGate’s sandbox at sandbox.coingate.com can’t take real payments, and Komerza won’t accept them.
1
Create an API key in CoinGate
-
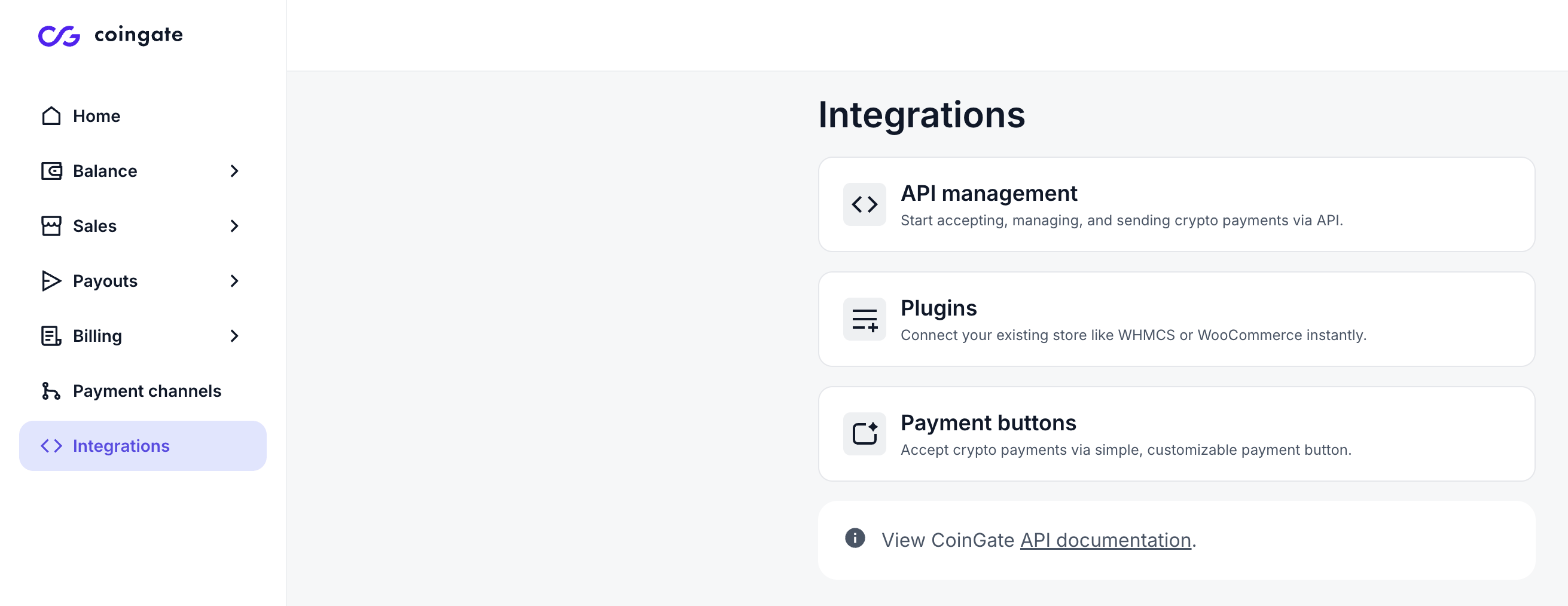
Log into your CoinGate dashboard. In the sidebar, click Integrations, then API management.
-
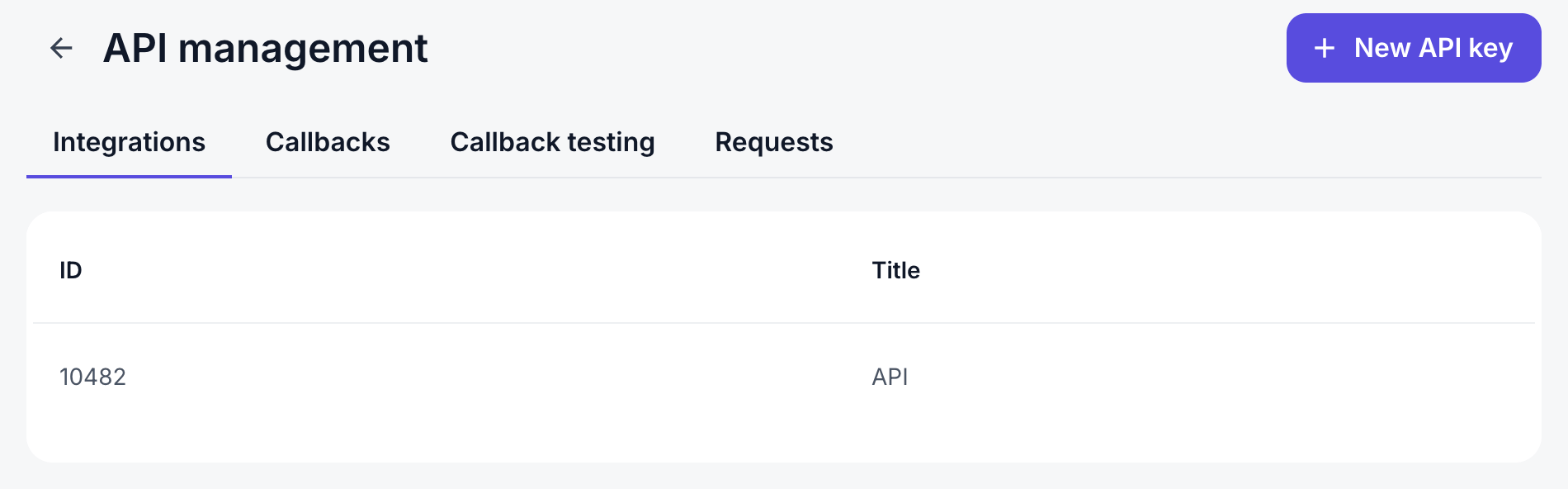
Click New API key.
-
Enter an API key title you’ll recognise, such as
Komerza. To accept payments that arrive slightly short, also set Underpaid cover percentage - see Underpayments.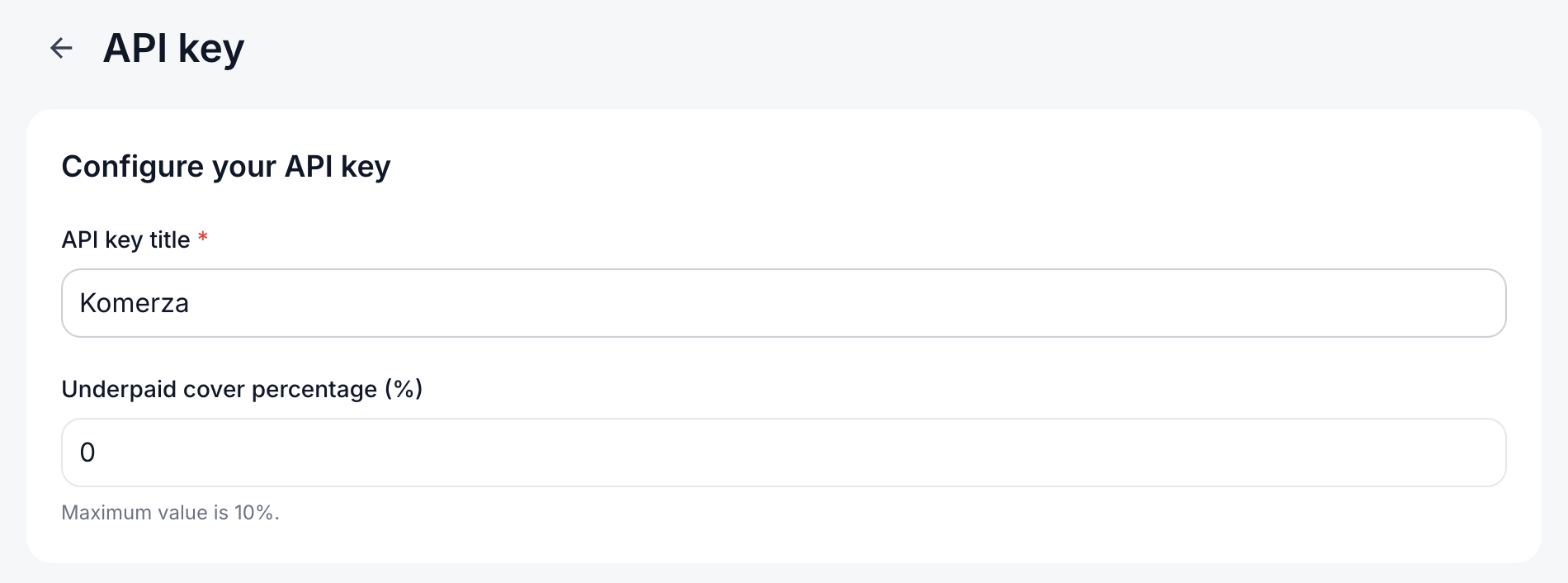
-
Under Advanced options, leave Whitelisted IP addresses empty. A key with addresses listed only answers requests from those addresses, so it would refuse Komerza and every payment would fail. Callback format can stay as it is - Komerza reads both. Turn on Paid notifications if you want CoinGate to notify you about each payment.
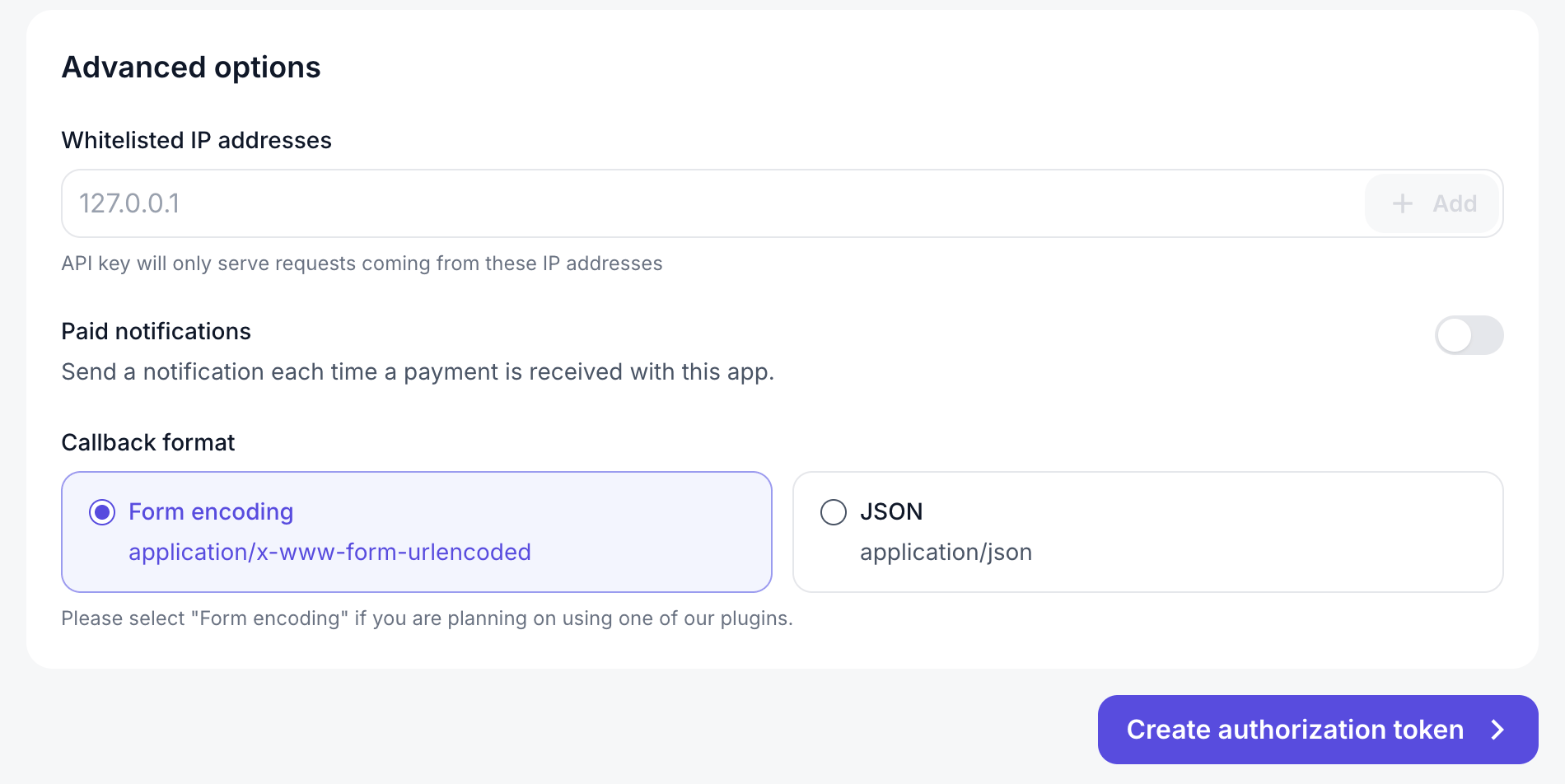
- Click Create authorization token and copy the token.
2
Connect CoinGate in Komerza
- In your dashboard, click Settings at the bottom of the sidebar, then Cryptocurrency. If it isn’t listed yet, click Payment Methods, then Set up on the Cryptocurrency card under Available Payment Methods.
-
Under Processors, find CoinGate and click Connect.


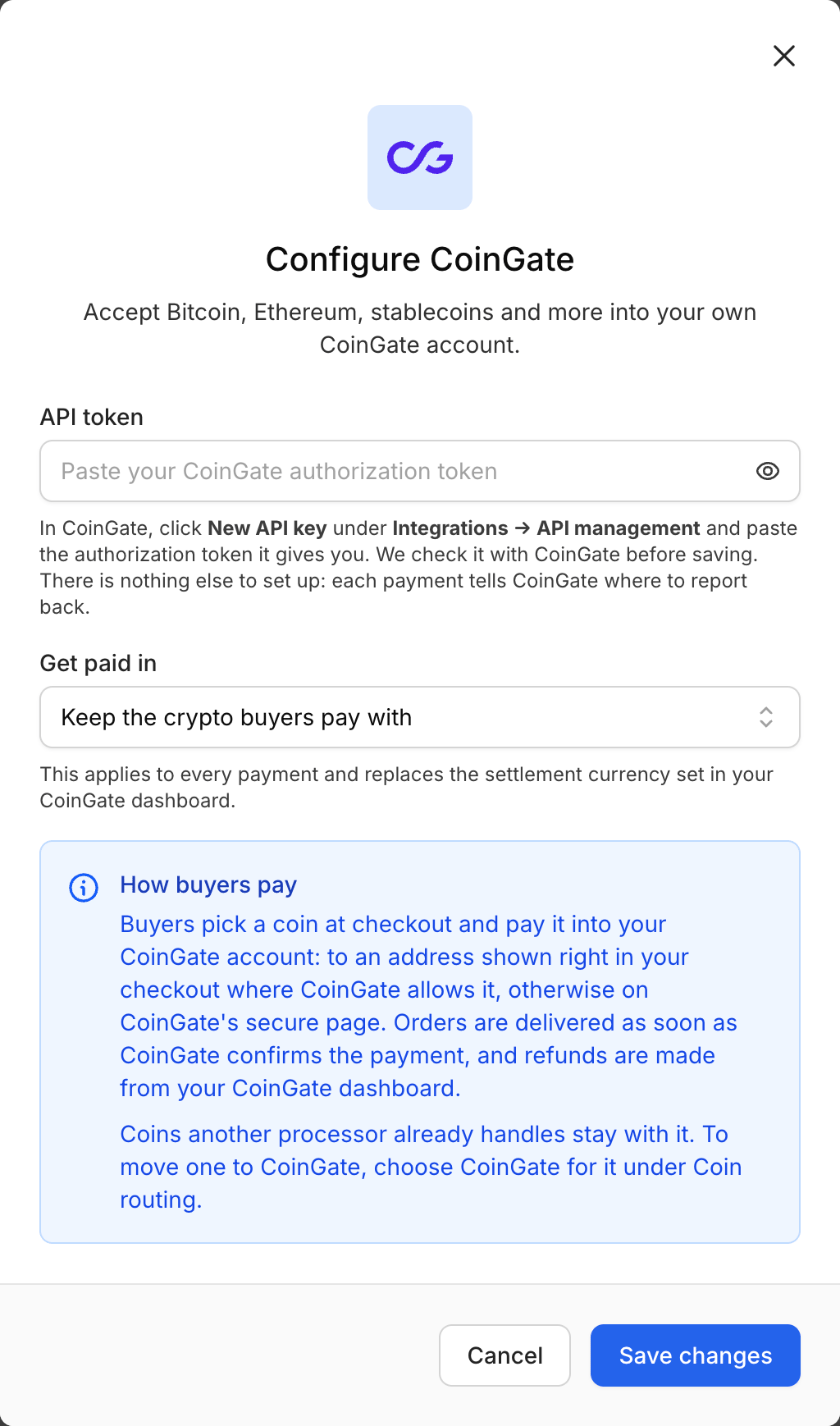
- Paste the token into API token.
- Under Get paid in, choose what CoinGate credits you in - see Choosing what you get paid in. Keeping the crypto is the default.
- Click Save changes.
3
Test with a small payment
A live CoinGate account has no test mode, so make a small real purchase on your store. Pay with crypto, and check the order is delivered once CoinGate confirms the payment.
Choosing what you get paid in
Get paid in decides what CoinGate credits to your balance for each payment.
The list comes live from CoinGate, so it always matches what CoinGate currently settles in. Your choice applies to every Komerza payment and replaces the settlement currency set in your CoinGate dashboard. CoinGate’s 1% exchange fee only applies to conversions you make by hand, not to automatic conversions at checkout.
To change it later, click Manage on the CoinGate card, pick a new option and click Save changes. Leave API token empty to keep the token you already saved.
What your customers see
- At checkout, the buyer chooses Cryptocurrency. If CoinGate is your only crypto option, they go straight to it. If you also accept coins through self-custody, NOWPayments or Heleket, CoinGate appears in the coin list as Other coins.
- Komerza sends them to CoinGate’s payment page, where they pick a coin and pay.
- Once they’ve picked a coin, the order shows as Verifying in your dashboard. It stays there while the network confirms the payment, and your unpaid-order window doesn’t cancel it.
- When CoinGate marks the payment Paid, Komerza delivers the order.
Underpayments
Wallets and exchanges often take their own fee before sending, so a buyer can send slightly less than the amount due. With Underpaid cover percentage at 0, CoinGate doesn’t mark a short payment as paid, so the order isn’t delivered. To accept small shortfalls, set Underpaid cover percentage on your API key, up to 10%. A payment within that margin is marked paid, Komerza delivers the order, and you absorb the difference. CoinGate suggests between 1% and 3%, and still charges its fee on the full order amount. To change it on an existing key, go to Integrations → API management in CoinGate, open the key, update the percentage and save.Refunds
Komerza can’t send crypto back through CoinGate, because CoinGate needs the buyer’s wallet address, which only CoinGate collects. Choose one of these:- Return the crypto in CoinGate. Go to Sales → Orders, open the paid order and click Submit refund. Enter the amount, the refund currency, the buyer’s email and their wallet address. CoinGate can ask the buyer to confirm by email before it sends anything. Refunds come out of your CoinGate balance, and CoinGate charges a small refund fee. The order stays Delivered in Komerza.
- Give store credit in Komerza. Click Process refund on the order page. For CoinGate orders, the refund always goes to the customer’s store balance as credit.
Changing or disconnecting
- Use a new token: click Manage on the CoinGate card, paste the new token and click Save changes. A token from a different CoinGate account is refused while payments on the current one are still confirming - link it once they’ve finished.
- Disconnect: click Disconnect on the CoinGate card. CoinGate comes off your checkout straight away and Komerza forgets your token. Payments that are already confirming still finish and are delivered.